Pages

4/10/2013

10 programs that make Windows 8 better

So you have made the jump and installed Windows 8 on a computer, or, you are planning to buy a tablet, laptop or desktop PC running Microsoft's latest operating system. If this is your first contact with the OS, chance is that you will need some time adjusting to the new startpage, missing start menu, and all the smaller changes that come with it. I think we can all agree that Windows 8 is different, and that not only shows when you first boot into the operating system, but also when you try to run programs or tasks that may no longer work out of the box.
The following top list highlights ten applications that you may want to install on your Windows 8 system to either add missing functionality to it, improve existing functionality, or even remove some of the features that you do not want to work with. Lets get started.

DVD Playback

Windows 8 can't play DVDs by default, as Microsoft stripped Windows Media Player of those capabilities. The only native option to get DVD playback integrated again is to get the Media Center Pack / Pro Pack that makes available Windows Media Center which supports disc playback. This still leaves Windows Media Player without the options though.
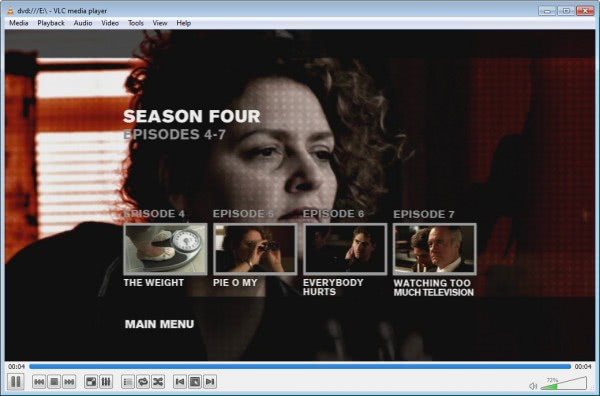
If you do not want to buy the upgrade, you can instead install DVD player alternatives such as VLC Media Player or SMPlayer, both free and compatible with the Windows 8 operating system.

play dvd vlc media player


Start menu

Windows 8 ships without a start menu. Microsoft more or less has replaced it with the start page the operating system boots into. While that may work for some, others may prefer access to a start menu like interface right on the desktop, so that they do not have to switch over to the start page every time they want to launch a program that is not pinned on the taskbar or available on the desktop as a shortcut.
The best solution for that is Start8 from Stardock, as it makes available both desktop apps and Metro apps in the start menu that looks and feels exactly like the Windows 7 start menu. The only downside is that it is in beta currently, and that it may happen that it will not remain free when it is released. A free alternative is Classic Shell which is also an excellent program.


start-8


Gadgets

Microsoft has removed desktop gadget support from Windows 8 during development which puts users who want gadgets functionality in the unique position to get them back with hacks that integrate the components from earlier builds of Windows 8 back into the final version.
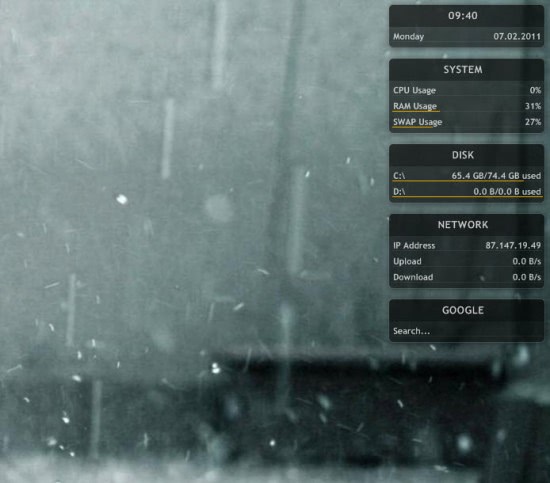
Unless you really depend on a gadget, I'd suggest to install a third party solution instead. Rainmeter comes to mind which ships with a number of gadgets installed.

rainmeter desktop


Blue Screens

Blue Screens in Windows 8 display less information about the cause of the crash. While it still displays the error code, part of the technical details of the error have been removed from the screen. To get those back, you need to use a program like Blue Screen View from Nirsoft.


windows 8 blue screen


Aero Glass

Aero Glass has always been a controversial feature. Some users love the transparency it adds to windows in the operating system, while other dislike it with a passion. Microsoft has removed Aero Glass from Windows 8 during development, pretty much in the same way that it removed the desktop gadgets.
Aero Lite Tweaker is a program that adds Aero Glass support back to the Windows 8 operating system. It comes as a price though as you can't reverse the changes that it makes unless you have a backup of sorts at hand.


windows 8 no aero glass


CD/DVD burning

With optical drives making a quite exit for some time now in the computing world, Microsoft has not improved the CD or DVD burning capabilities in Windows 8. If burning files or ISO images is not sufficient for your needs, you need third party software to enhance the capabilities of the operating system in this regard.
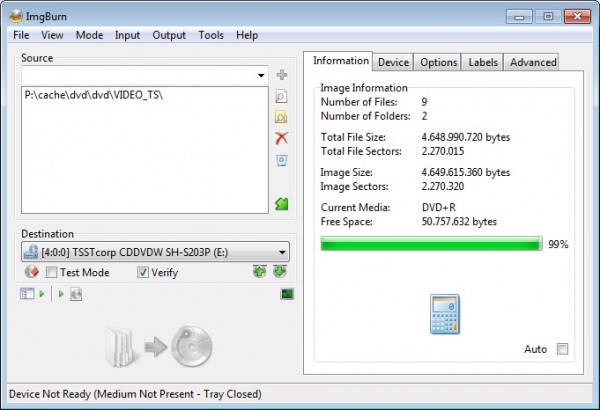
ImgBurn is a free alternative that you can use for all your DVD burning needs.

imgburn


Windows Explorer

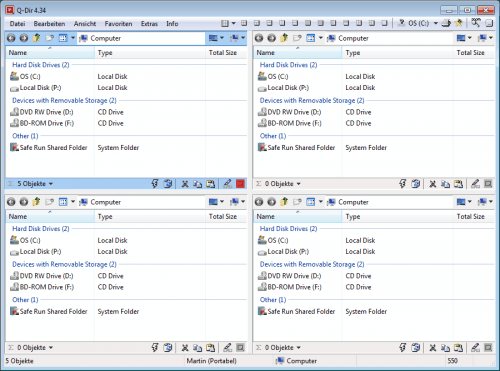
Windows Explorer now features a ribbon interface that is minimized by default. What's still missing is two-pane support to make file operations more comfortable. You can check out Explorer alternatives such as Ultra Explorer or Q-Dir.


q-dir
q-dir


Security

Windows 8 ships with Windows Defender (which more or less is Microsoft Security Essentials and then some) included. While that's a good start, you may prefer to install additional security software to protect the operating system.
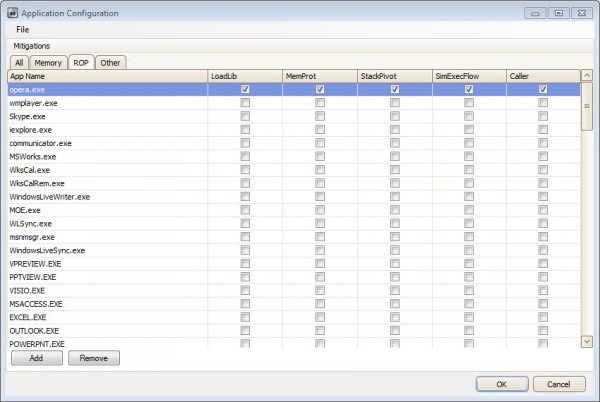
Besides installing an antivirus application like Avast Free Antivirus or AVG Free, you can also install EMET, an exploit mitigation tool from Microsoft on the system. And for the occasional scan, you have got Malwarebytes Anti-malware, Superantispyware or Dr. Web Cure It.


emet 3.5


Backup

It is still recommended to use third party backup software to backup data regularly. Windows 8 comes with a new set of features, like cloud synchronization of settings and features, but it is still missing a comfortable backup solution. A free alternative is RecImage which backs up core operating system files and installed applications. It is using the refresh and reset feature of Windows 8, but adds options to keep installed applications on top of it.


recimg manager


Image editor

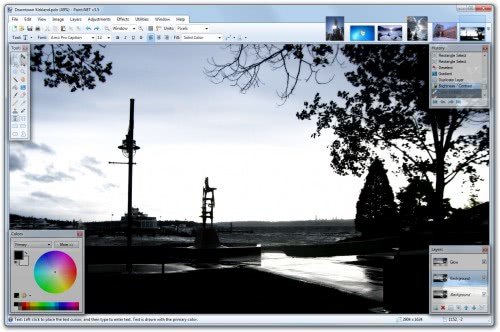
Paint is still a mediocre image editor, and not really usable for anything besides light image editing operations. It may even not be sufficient for editing screenshots, something that I do on a regular basis. Alternatives are available, such as Paint.net or Gimp which you can use instead.


Closing Words

One of the biggest strengths of the Windows operating system is its third party development scene. It comes up with new and improved applications regularly, so that missing features can be added easily to the OS. This makes Windows 8 not different from previous Microsoft operating systems. Even Windows 7 or Windows XP had their missing features and great third party apps that made them available.

Source: http://www.ghacks.net/2012/09/03/9-programs-that-make-windows-8-better/
Use DVD Styler to Burn DVDs in Win8 - freeware

I make a lot of DVDs. I make them for weddings for family and for funerals and memorials. I make trip DVDs and memory DVDs and all sorts of stuff.
Why don't you put all that stuff online, Scott? Why don't you put it on Facebook/YouTube/Vimeo/Whatever? There's a couple reasons. First, believe it or not, there's a lot of people in the world who don't have high-speed internet. We've got lots of relatives overseas who don't have a laptop at home nor do they have any internet in their home. Here in the US we've got lots of older relatives who don't have computers, or perhaps they only have an iPad and a link to a YouTube video doesn't have the sense of meaning or permanence that a DVD does.
Random Aside: It's a shame that today's young people won't realize how much effort it took to create a mix tape for someone. Rearranging MP3s and emailing a list isn't the same as waiting for specific songs to get played on the radio and pressing Record within the first two notes.
Perhaps making DVDs is a lost art and I'm an old fogey. Or perhaps DVDs are today's mix tapes.
Regardless, I recently installed Windows 8 on my home machines and my laptop. Around the same time my Uncle Ronald - the closet person I've ever had to a grandfather - passed away. I immediately got to work creating a DVD for his memorial service. I had 30 minutes of audio of Uncle Ronnie that I recorded for a never-aired podcast. I had hundreds of photos over 90+ years of his life, 8mm and Super8 film reels as far back as the 50s, combined with digital video going all the way back to 1998 from my own collection. I was looking forward to burning many DVD copies and mailing it to interested relatives as well as playing the DVD at the memorial.
I spent many hours putting together a tribute video. I used Movie Maker as I have for many of my projects. I also have Adobe Premiere but for putting together family videos there's little easier than Movie Maker. I did my editing and went to Save Movie to export my movie as a WAV to import into Windows DVD Maker. But there was no DVD option. Confused, I searched the start menu for Windows DVD Maker. I'd used it just a week before...before I upgraded my Windows 7 to Windows 8.


Windows DVD Maker was gone. It's not in Windows 8. :(
I was pretty bummed as I needed to make DVDs for the memorial event and I kind of needed them immediately. There's lots of different third party DVD creation software packages but I've always personally felt that media players and media creation software from 3rd parties (Roxio, CyberLink, etc) have always been rather garish in their user interface style. They never LOOK like they belong in Windows. There's always bright red window chrome, the same airbrushed happy clipart families in splash screens.
I just want to import a video file into a simple app and create a DVD. Preferably for free.
Save as DVD from within Windows Movie MakerI evaluated a number of DVD creation suites over a number of hours and decided on the open source DVDStyler. I like DVDStyler because it's extremely spartan in its user interface but extremely capable. One could believe it was included with Windows and it is an excellent complement to Windows Live Movie Maker. For me, installing DVDStyler makes up for DVD Maker being gone on Windows 8.
IMPORTANT NOTE/WARNING: While it is an open source GPL'ed project, in order to support itself DVDStyler does install some toolbar software and will change your browser home page and install additional software if you just "next, next, next, finish" through their installation process. When installing free software please ALWAYS be aware of what you're saying YES to. Be sure to use the Custom installation option and select (or deselect) the options that are right for you. While I found these changes surprising and an annoyance, I feel the value provided by this free software to be worth the annoyance of these other applets. I removed them later via Uninstall Programs as well as by manually removing extensions in Firefox and IE.


When you save your movie from Windows Live Movie maker, you might want to make a Custom Production Setting. I created one and called it DVD and set it to 720x480. You might change this if you are creating PAL (720x576) or NTSC DVDs. It's up to you. The point is that Windows Live Movie Maker has no standard DVD movie creation option anymore but you can create any custom setting you'd like.


Creating a Custom DVD Setting in Windows Live Movie Maker


In DVDStyler I use similar settings. Be sure to select 16x9 if most of your source material is widescreen and most of your destination TVs are also widescreen. I usually use DVD-5 (4.7 gigabytes) but occasionally I'll use a dual-layer DVD-9 (8.5 gigabytes) and a high bitrate if there is a lot of action on the screen.
You can burn the DVD directly or, if you want more control, create an ISO file and use another tool like ImgBurn to burn or create multiple copies.


Burn image from DVDStyler

I'm glad to have found a reasonable, simple and free option for creating DVDs on Window 8 in DVDStyler.


Source: http://www.hanselman.com/blog/HowToCreateADVDOnWindows8EvenThoughWindowsDVDMakerIsGoneDVDStyler.aspx

About DVDStyler

DVDStyler is a cross-platform free DVD authoring application for the creation of professional-looking DVDs. It allows not only burning of video files on DVD that can be played practically on any standalone DVD player, but also creation of individually designed DVD menus. It is Open Source Software and is completely free.

Features

Screenshot
Tip: DVDStyler is PC software, not self-hosted web software, so a web hosting plan is not required.
  • create and burn DVD video with interactive menus
  • design your own DVD menu or select one from the list of ready to use menu templates v1.8.0
  • create photo slideshow
  • add multiple subtitle and audio tracks
  • support of AVI, MOV, MP4, MPEG, OGG, WMV and other file formats
  • support of MPEG-2, MPEG-4, DivX, Xvid, MP2, MP3, AC-3 and other audio and video formats
  • support of multi-core processor
  • use MPEG and VOB files without reencoding, see FAQ
  • put files with different audio/video format on one DVD (support of titleset)
  • user-friendly interface with support of drag & drop
  • flexible menu creation on the basis of scalable vector graphic
  • import of image file for background
  • place buttons, text, images and other graphic objects anywhere on the menu screen
  • change the font/color and other parameters of buttons and graphic objects
  • scale any button or graphic object
  • copy any menu object or whole menu
  • customize navigation using DVD scripting


Source: http://www.dvdstyler.org/en/

2 Free DVD-CD Burning Progams

While Windows 8 has its own DVD-CD burning program, it can be slow at times. In addition, it offers no capability for creating ISO images. These do.

ImageBurn

ImageBurn enables you to burn most types of DVD/CD images, including .iso, .nrg, .bin, .img and others. The program offers direct support for many of the latest CD/DVD writers. In addition to writing of images, you can also use the software to build your own ISO images from files and folders of your choice. ImgBurn includes a variety of advanced features to deal with dual layer DVDs, create DVD folder structures and more. Very capable, no documentation provided though.


You can get it here:
http://www.snapfiles.com/get/ImgBurn.html

BurnAware Free

BurnAware is a CD/DVD/BlueRay disc burning software that is designed to cater to your basic disc burning needs. You can create data discs for backup purposes, Audio CDs that can be played on any CD player as well as music discs with MP3 and WMA files to be played on a PC or compatible CD/DVD player. The program also supports burning and creation of standard disc images in .iso format. BurnAware Free does not support bootable discs, disc copying, a commercial version is available that offers those features. This program automatically installs the Ask.com toolbar unless you opt-out.


You can get it here:
http://www.snapfiles.com/get/burnawarefree.html
.

4/05/2013

How to Refresh Your Computer Running Windows 8

How to Refresh Your Computer Running Windows 8

The new Windows 8 Refresh tool enables you to get Windows 8 to reinstall itself onto your computer. And while installing a fresh copy of itself, Windows 8 saves your user account, your personal files, your apps downloaded from the Windows Store, and some of your most important settings.
Choosing Refresh saves settings from your wireless network connections, as well as from your cellular connection, if you have one. It also remembers any BitLocker and BitLocker-To-Go settings, drive letter assignments, and personalization settings, including your lock screen background and desktop wallpaper.
When your computer wakes up feeling refreshed with its new copy of Windows 8, you only need to reinstall your desktop programs. (The program politely leaves a handy list of those programs on your desktop, complete with website links, so you know exactly what to reinstall.)
To refresh your ailing computer, follow these steps:
  1. Open the Charms bar and click the Settings icon (shown in the margin).
    You can fetch the new Charms bar by pointing your mouse cursor at the screen’s top- or bottom-right corner, sliding a finger inward from a touchscreen’s right edge, or pressing Windows+C with a keyboard.
    When you click the Settings icon, the Settings pane appears.
  2. At the bottom of the Settings pane, click the words Change PC Settings to open the PC Settings screen. Then click the word General from the PC Settings screen’s left edge.
  3. Scroll down the right side of the PC Settings screen’s General section. When you reach the section called Refresh Your PC Without Affecting Your Files, click the Get Started button.
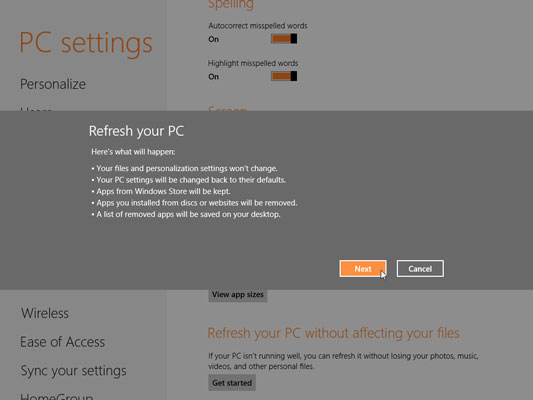
    Windows displays the window shown, explaining what will happen to your computer.

    image0.jpg


  4. Click Next to start the Refresh process.
  5. If asked, insert your Windows 8 disc, flash drive, or whatever else you used to first install Windows.
    When you insert the disc or drive, Windows 8 automatically grabs the files it needs.
    Don’t have a Windows 8 installation disc or drive? Then click Cancel. You can’t use the Refresh option, unfortunately.
  6. Click the Refresh button.
    Windows 8 refreshes your computer, using any files it needs from the disc or drive you inserted in the previous step. It may restart a few times during the process, which usually takes less than a half hour.
When your computer wakes up, it should feel refreshed and ready to work again. Expect any or all of the following things to take place when refreshing your computer:
  • If you’ve inserted a Windows 8 DVD into your computer in Step 5, be careful when your computer restarts. As it restarts, your computer may ask you to “Press any key to boot from disc.” Don’t press any key. That lets Windows 8 load itself from your computer’s hard drive rather than the DVD.
  • When your computer wakes up, you find an Internet Explorer link called Removed Apps waiting on your desktop. Click it, and your web browser displays a page with links to any programs and apps that you’ll need to reinstall — if you decide you miss them, that is. (And if you do miss them, you’ll need the program’s installation discs to reinstall them.)
  • Shortly after Windows 8 wakes up, it visits Windows Update to download and install oodles of security patches.
  • After refreshing your computer, reinstall your programs one by one, restarting your computer after each new install. That gives you the best chance to weed out any misbehaving programs that may have caused the problems that messed things up.
  • If you’re connected to a network, you need to tell Windows 8 whether you’re on a home network or a public network. You also have to rejoin your Homegroup.
For more information about Windows 8 and its features, explore Windows 8 For Dummies, available online.

Source: http://www.dummies.com/how-to/content/how-to-refresh-your-computer-running-windows-8.html

Refresh your Windows 8 system from a Recovery Drive

Takeaway: Greg Shultz explains how to use the default mode of the Windows 8 Refresh your PC tool from the Recovery Drive.


While Microsoft went to every effort to ensure that Windows 8 is a solid operating system, sometimes your system can become unstable. Perhaps you have recently recovered from a nasty virus infection, or maybe you installed an incompatible software application, or possibly a wiggy device driver. You could have even installed an update patch that for some reason left your system behaving erratically. Whatever the cause, Windows 8 has several tools that you can use to revise an unstable system.
This blog post is also available as a TechRepublic Photo Gallery.
Of course, in this type of situation, your first line of defense is to use System Restore to put your system back into the state that it was in when the last restore point was created. However, there could be any number of reasons why this would not result in an effective resolution. In the past, you would have had no choice but to restore your system from a backup or totally reinstall the operating system from scratch.

Refresh your PC

With Windows 8, you have a new intermediary solution called Refresh your PC, which you can access from the Recovery Drive as I showed in a previous post: Be ready to use the Windows 8 Recovery Drive. The Refresh your PC tool will essentially perform a fresh install of Windows 8. More specifically, when you choose this option from the Recovery Drive, the Refresh your PC tool will find and backup all your data, settings, and apps. It will then install a fresh copy of Windows and restore all of your data, settings, and apps. When your PC restarts, you can log in with your exact same username and password and find all of your data.
Now, in its default mode, the Refresh your PC tool does not backup and restore any desktop applications that you have installed. The reasoning is that it is possible that a recently installed desktop application could be the cause of the instability. To help you to remember what desktop applications you had installed, the Refresh your PC tool will create a list of those applications that were not saved or restored, so that you can decide whether you want to reinstall them later.
If you have been reading carefully, you noticed that I used the phrase in its default mode in the above paragraph. The reason is that there is a command line tool that will allow you to create your own custom image that will contain your applications. However, preparing for, creating, and using a custom image is a fairly detailed operation that comes with a couple of potential pitfalls. As such, I have decided that the topic warrants its own article, which I will write for next week.
In this edition of the Windows Desktop Report, I’ll take a look at using the default mode of the Refresh your PC tool from the Recovery Drive. As I do, I’ll explain how it works.

OEM recovery

Before we get started there is one more thing you need to be aware of and that is that the Refresh your PC operation works differently when there is an OEM recovery partition involved. In fact, it appears that each OEM has their own method of incorporating a recovery procedure in the Windows 8 Recovery Drive. As such, I cannot really cover an OEM recovery in this article since there isn’t a generic procedure. Therefore, it is imperative that in addition to reading this article, you visit your computer manufacturer’s Web site and investigate their recovery procedure for Windows 8 systems.
For demonstrating the Refresh your PC operation in this article, my example system had Windows 8 installed using the clean install procedure I described in the article The complete guide to a Windows 8 clean installation. So there is no OEM recovery partition.

What you need

In order to run the Refresh your PC tool as I’ll describe in this article, you’ll need to have created a Recovery Drive as I showed you in the article Create a Recovery Drive in Windows 8. You will also need to have your Windows 8 installation DVD.

In case you are wondering

As I mentioned in the introduction, I’m going to cover the use of the Refresh your PC tool from the Recovery Drive. However, you should know that the Refresh your PC tool can also be launched from within Windows. To do so, you would press [Windows]+W to bring up Search Settings and type Refresh in the text box. You can then launch the Refresh your PC tool.
However, when it comes to performing this type of operation, I prefer to launch the Refresh your PC tool from the Recovery Drive. My thought process here is that if the system is unstable and I don’t trust the way that it is behaving, why would I want to launch a recovery operation from an unstable environment? I just think that it is much wiser to launch the recovery process from a stable environment, such as the one provided by booting your system using the Windows Recovery Environment, which is the platform that boots up the Recovery Drive.

Running Refresh your PC

Running Refresh your PC from the Recovery Drive is easy. While I am booting the Recovery Drive from a USB flash drive, you can just as easily boot the Recovery Drive from the optical disc. (As a part of my research for this article, I ran the Refresh your PC operation after booting from an optical disc and the procedure is basically identical.)
After your system boots from the Recovery Drive and you select the Troubleshoot option from the main menu, you’ll see the Troubleshoot screen shown in Figure A.

Figure A

When you select the Troubleshoot tile, you’ll see the Troubleshoot screen and can select the Refresh your PC tile.
When you select the Refresh your PC option, you’ll see the screen shown in Figure B. After you read through the information on the screen, which I have summarized above, you can click the Next button.

Figure B

After you read through the information on the screen, you can click the Next button.
You’ll then be prompted to choose the operating system that you want to refresh, as shown in Figure C. At first this seems to be a redundant question, but I suppose you could have a dual-boot configuration with Windows 7 and you want to refresh Windows 8 while leaving Windows 7 as it is. I’ll have to investigate further by performing a refresh operation on a dual-boot configured system to see if this is indeed the case.

Figure C

Choose the Windows 8 tile.
When you see the screen shown in Figure D, which prompts you to insert the Windows 8 installation DVD, you will want to remove the USB Recovery Drive at the same time as you insert the DVD. The reason being that the system will reboot several times and having a bootable USB flash drive connected to the system will cause unnecessary delays. It is not needed from this point forward anyway. Obviously, if you booted from an optical disc, you will have to remove it to insert the Windows 8 installation DVD.

Figure D

You’ll be prompted to insert the Windows 8 installation DVD.
Once you insert the Windows 8 installation DVD, the system will immediately recognize it and after a few moments display the screen shown in Figure E. If you are refreshing a laptop, you will want to make sure that it is plugged in and not running on battery because the next phase of the refresh takes a while and you don’t want the system to shut down in the middle of it.

Figure E

Once the operation recognized your installation disc, you’re ready to begin.
As the refresh operation chugs along, you’ll see a screen like the one shown in Figure F that indicates the percentage of the operation that is complete. On my test system, this took somewhere around 40 minutes. When the percentage count hit 99%, I thought that is was ready to finish, but it actually sat at the 99% mark for quite a long time.

Figure F

The refresh phase takes a while to process.
Once the Refresh phase is complete, the system will reboot. When it does, you will see a screen like the one shown on Figure G, which prompts you to choose an operating system. You really don’t have to make a selection, as both selections indicate the newly refreshed operating system. Just allow the countdown to complete on its own and the system will reboot.

Figure G

After the system reboots, you will be prompted to select an operating system, but there is no need.

Side bar notes

Now, I must admit that when I first saw the screen shown above, I was concerned that something went wrong. As I looked more closely, I saw that both options were the same and just let the system do its thing - I recommend that you do the same thing. When my test system rebooted, everything proceeded just fine. (Just to be sure, when the refresh operation was totally complete after the first time, I went into Disk Management to make sure that the process didn’t inadvertently create another partition on the system, but it didn’t. In fact, each time that I ran the refresh operation I saw this screen and everything worked fine, so either it is a normal part of the process or just something that occurred on my particular system. I couldn’t find any description of it on the Web. Now, I should point out that on one my tests I did encounter another anomaly after this first reboot. This could have occurred because I ran multiple refresh operations one after another as I was testing, but I thought I would mention it here just the same. Here is what happened:
After the Refresh phase was complete, the system rebooted and the following message appeared on the screen:
BOOTMGR image is corrupt. The system cannot boot. At this point, I removed the Windows 8 installation DVD and pressed [Ctrl]+[Alt]+[Del]. When the system rebooted, it picked right up where it left off and everything proceeded just fine. I performed several more refresh operation tests and it never occurred again.
When the system reboots, the setup operation will begin finding and configuring any attached devices. You will then see the Welcome screen shown in Figure H.

Figure H

During the Setup phase, you’ll see the Welcome screen.
After a few moments, you will see your Login screen and will be able to log in with the same password - just like you always have. When you log in for the first time, some of the standard screens associated with Windows 8’s first run will appear. As promised all of your customized settings will be restored, so you won’t see those screens, but you will see the animated tutorial screens like the one shown in Figure I.

Figure I

After you log in, you will see the animated tutorial screens.
You will then encounter a series of three screens that change color as they inform you that Setup is getting your PC ready, reinstalling apps, and taking care of last minute details. This sequence is show in Figure J. In a moment you will see the Start screen and will find that all of the apps that you had installed are back in place.

Figure J

You’ll see a series of three screens that change color as they inform you that Setup is completing the necessary tasks.
To see what desktop applications were removed but not reinstalled, access the Desktop tile on the Start Screen. When you get to the desktop, look for an html file called Removed Apps. Open the file in Internet Explorer and you’ll see a display similar to the one shown in Figure K. As you can see in my example, I only had one desktop application installed, chances are that you will have a lot more, but this simple example allows you to see what this file will look like.

Figure K

An html file loaded into Internet Explorer shows you what desktop applications were removed but not reinstalled.
At this point, you can begin reinstalling your desktop applications. You can then get right back to work on a stable system.

What’s your take?

Now that you know how the Refresh your PC option works, you’ll be ready to use it should the need arise. Have you used Windows 8’s Refresh your PC tool yet? If so, did it get your system back into a stable state? As always, if you have comments or information to share about this topic, please take a moment to drop by the TechRepublic Community Forums and let us hear from you.

Also read:

Create a Recovery Drive in Windows 8

Create a Recovery Drive in Windows 8

Takeaway: Greg Shultz shows you how to create a Recovery Drive in Windows 8 for both a flash drive and an optical disk.
If you haven’t done so yet, you need to create a recovery drive for your Windows 8 system. Doing so now will save time and effort, not to mention grief, should you encounter a problem with your Windows 8 installation. A Recovery Drive will allow you to boot your system and easily access a number of recovery and troubleshooting tools that you can use to revive an ailing Windows 8 system.
Unlike its predecessor, Windows 8 allows you to create a Recovery Drive using a USB flash drive, which provides you with new capabilities, such as being able to backup an OEM recovery partition. Of course, you can also create a Recovery Drive on an optical disc - just like you did in Windows 7. While both procedures end up with the exact same Recovery system, they are created from separate user interfaces - the USB Flash drive is created from a new user interface and the optical disc is created from the old System Repair Disc user interface. Why Microsoft didn’t unify the process under one roof, I don’t know.
This blog post is also available as a TechRepublic Photo Gallery.
In this edition of the Windows Desktop Report, I’ll show you how to create a Recovery Drive in Windows 8 using a USB flash drive. I’ll also show you how to create a Recovery Drive on an optical disc.

Automatically sign up for TechRepublic's Windows and Office newsletter!

Caveat

Regardless of whether you are creating a Recovery Drive using a USB flash drive or on an optical disc, it is important to remember that a Recovery Drive is bit specific. In other words, if you create a Recovery Drive in a 64-bit version of Windows 8, you can’t use that drive to boot up and repair a 32-bit version of Windows 8. Likewise, you can’t use a 32-bit Recovery Drive in a 64-bit system.

Using a USB Flash Drive

To begin with, you need to know that the USB flash drive you choose to use will become a dedicated Recovery Drive - you won’t be able to use it for anything else. In its base configuration, the contents of the Recovery Drive will require about 256MB of space. However, if you choose to include the OEM recovery partition, you’ll need more space. Thus, if you are creating a basic Recovery Drive, you can use a 1GB USB flash drive. (If you have a smaller sized drive, from the old days, you could use it as well.) If you are going to add OEM recovery partition, you’ll want at least a 16GB USB flash drive.
To launch the USB flash drive version of the Recovery tool, use the [Windows] + W keystroke to access the Search Settings page, type Recovery Drive in the text box, and click Create a recovery drive, as illustrated in Figure A. You’ll then encounter a UAC, as shown in Figure B and will need to click Yes to continue. As you can see in the UAC dialog box, the program name is shown here as Recovery Media Creator.

Figure A

Accessing the Recovery Drive tool from the Start screen is easy.

Figure B

When you launch the Recovery Drive tool, you’ll encounter a UAC.
In a moment, you’ll see the first screen in the Recovery Drive wizard, as shown in Figure C. If your computer came with an OEM recovery partition, the Copy the recovery partition check box will be enabled allowing you to include the contents of the recovery partition on the recovery USB flash drive. (If you select this option, you’ll need a sufficiently large capacity USB flash drive.) To continue, click Next.

Figure C

If your computer came with an OEM recovery partition, the Copy the recovery partition check box will be enabled.
In the next screen of the Recovery Drive wizard, you’ll be prompted to select your USB drive. If the drive isn’t already connected to your system, you can insert it now. When you do, Windows 8 will rescan the system and display your drive. Now, as you can see in Figure D, since I am only creating a basic Recovery Drive, the wizard informs me that the drive will only need to hold at least 256MB and that everything currently on the drive will be deleted. Remember, this will become a dedicated Recovery Drive. Once you select your USB flash drive, click Next.

Figure D

The USB flash drive you choose to use will become a dedicated Recovery Drive.
In the next screen, as shown in Figure E, you are once again warned that the contents of the drive will be deleted. To continue, click the Create button.

Figure E

You are again warned that everything on the drive will be deleted.
When you do, Windows 8 will format the drive and the begin copying files to the drive, as shown in Figure F. If you are creating a basic Recovery Disk, the process will just take a few minutes. If you are including a recovery partition, go get yourself a cup of coffee - it could take as long as an hour.

Figure F

If you are including a recovery partition, the creation process can take up to an hour to complete.
When the process is complete, Windows 8 will open the drive so that you can see the contents, as shown in Figure G. You can then close the Recovery Drive wizard by clicking the Finish button.

Figure G

When the process is complete, you will see the contents of the drive in file Explorer.
If you included a recovery partition on the USB flash drive, when the process is complete, you’ll be prompted to delete the recovery partition from the hard disk to free up space, as shown in Figure H. If you delete the recovery partition, you’ll then have to use Disk Management to extend your system partition into the newly freed up space.

Figure H

If you included a recovery partition on the USB flash drive, you’ll be prompted to delete the recovery partition from the hard disk.
Keep in mind that, you should only delete the recovery partition if you are really hard up for disk space. The reason that I say that is that without the recovery partition on the hard disk, it is imperative that you not loose or accidentally reformat your USB Flash Disk as it now contains you only copy of the recovery partition. On the flip side, you may want to create a System Image that contains a copy of the recovery partition. I suppose that you could create two USB Flash Disk Recovery disks that include the recovery partition so that you have a backup of your recovery partition.

Using an optical disc

If you want to use an optical disc to create a Recovery Drive, you’ll launch the Windows 7 File Recovery tool and use the old System Repair Disc interface. Keep in mind that while you will use this legacy interface, you will indeed end up with the same Windows 8 Recovery system created with the new Recovery Drive wizard.
To launch the optical disc version of the Recovery tool, use the [Windows] + W keystroke to access the Search Settings page, type Windows 7 File in the text box, and click Windows 7 File Recovery, as illustrated in Figure I.

Figure I

Accessing the Windows 7 File Recovery tool from the Start screen is easy.
Now, when you see the Windows 7 File Recovery user interface, select the Create a system repair disc command on the left side of the screen to launch the creation tool. This process is illustrated in Figure J. To start the procedure, click the Create disc button.

Figure J

You’ll launch the Create a system repair disc procedure from the Windows 7 File Recovery user interface.
You’ll then see the program begin the process of creating the disc. This process is illustrated in Figure K.

Figure K

Creating a Recovery Drive on an optical disc is a relatively quick procedure.

What’s your take?

Will you use a USB flash drive to create a Recovery drive? Or will you use an optical disc? Will you backup and remove an OEM recovery partition? As always, if you have comments or information to share about this topic, please take a moment to drop by the TechRepublic Community Forums and let us hear from you.

Source: http://www.techrepublic.com/blog/window-on-windows/create-a-recovery-drive-in-windows-8/7261